


Most advice on LinkedIn new-job posts forces a choice. Use the "I'm happy to share" auto-text. Or write something original. Pick a side.
The data shows neither side alone is the right move.
We analyzed LinkedIn new-job-announcement posts published between September 2025 and February 2026 (personal profiles only). Posts that opened with "I'm happy to share" earned a 5.08% median engagement rate, against a sample median of 3.98%. They also drew more median impressions: 2,037 vs 1,651 for the sample. The likely reason isn't the language. It's that LinkedIn auto-generates this exact opener when you update your Experience section, and bundles the post with a network notification that custom posts don't get.
But the LinkedIn-template bucket includes two kinds of posts: bare auto-text published as-is, and the same opener with a customized body underneath. The smart play, from everything else we know about how LinkedIn posts work, is to take both: keep the auto-text opener (so you get the notification bundle), then customize the body, the image, and the call to action so the post still sounds like you. And if you have the time, write 2–3 follow-up posts in the week or two after, to convert the attention into deeper engagement.

That's the structure this guide is built around. The 8 templates below are what you write after the auto-text opener, or what you write when the auto-celebration doesn't fit your situation.
How to Announce a New Job on LinkedIn (Quick Answer)
The data points the way. Three findings from our sample:
- The "I'm happy to share" opener correlates with the highest engagement and reach. 5.08% median engagement rate vs 3.98% sample median; 2,037 median impressions vs 1,651 sample median. The mechanism is LinkedIn's auto-celebration push notification (see below).
- Short crushes long. 1–50 word posts earned 5.22% median engagement. Past 100 words, engagement floats around 3%. The 301+ bracket is the worst at 2.96%.
- Brand-led openers land at the bottom. Posts that lead with the new company's mission instead of the author's role hit 1.57%, less than half the sample median. Story-led (3.17%) and achievement-led (2.98%) also sit below median, but the gap is smaller.
The practical play:
- Update your Experience section on LinkedIn with the new title and toggle "Notify network" ON. LinkedIn drafts a post starting with "I'm happy to share." Don't edit the opener. You lose the notification bundle if you do.
- Add 2–4 short lines below the opener: one specific thing you're excited about, a named thank-you, a question that invites comments. Keep the whole post under 100 words.
- Replace the default image with a real photo: you on day one, the team, the office. Skip stock and logo-only cards.
- Post one to two weeks after your official start date. Offers fall through, start dates shift, and there's no consequence for the company if either happens.
- Plan 2–3 follow-up posts for the next two weeks: what you're learning, what surprised you, the problem you're there to solve.
If you're a content creator with a regular cadence, or the auto-celebration doesn't fit (career switches, comebacks, internal promotions), use one of the 8 templates below and write the post yourself. For openers that work without LinkedIn's template, see our LinkedIn hook examples. For posting time, see how to schedule LinkedIn posts.
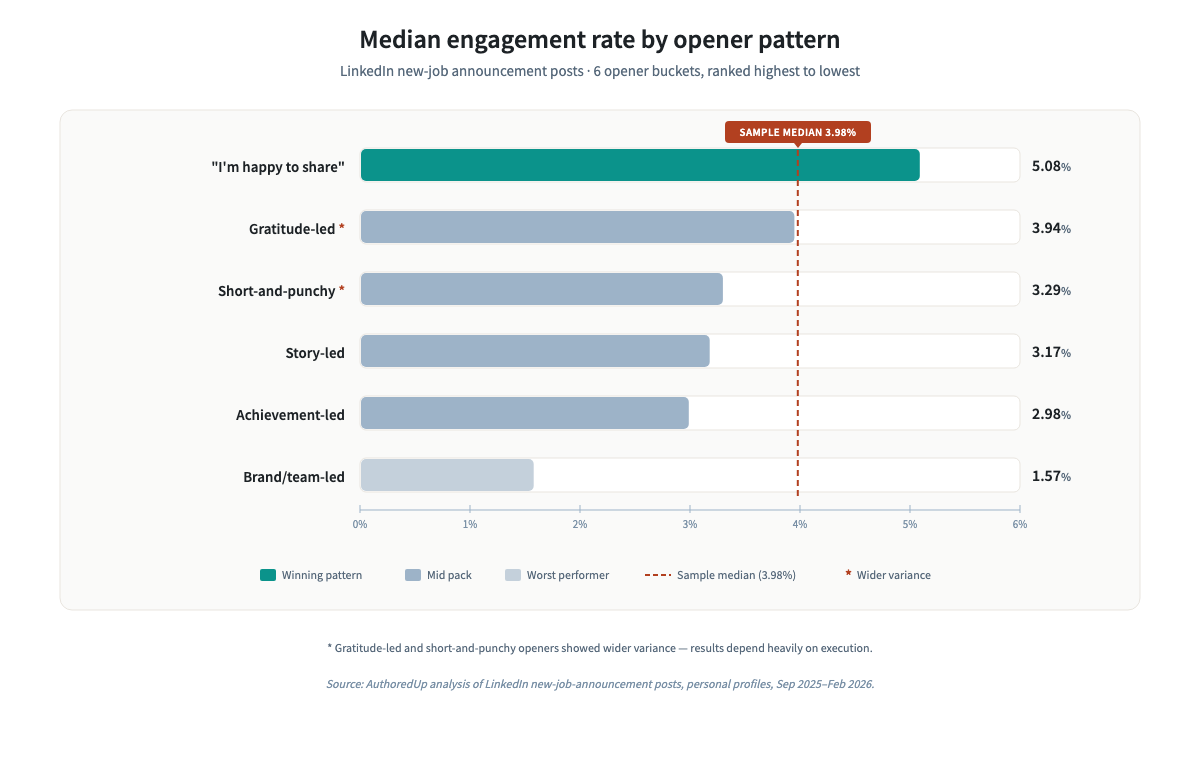
What the Data Shows: 6 Opener Patterns, Ranked by Engagement
We classified every matched post in our sample by the rhetorical move of its opening 1–2 sentences. Median engagement rate is the metric. It normalizes for follower count, so a creator with 500 followers and a creator with 50,000 followers contribute on the same scale.
Two readings from the table:
- The auto-text opener correlates with the highest engagement and reach. "I'm happy to share" is the only opener that clears the sample median, and it does so by more than a full point of engagement rate. Custom-written openers (story-led, achievement-led, brand-led) sit below.
- The LinkedIn-template bucket is heterogeneous. Posts that open with "I'm happy to share" can be three lines or three paragraphs, with or without a customized body, with or without a custom image. Our data can't separate them. The 5.08% median almost certainly reflects a mix of bare-auto-text posts and hybrid posts. The hybrid approach is what the rest of this guide builds on.
A note on the small samples. Gratitude-led and short-and-punchy each have only 8 posts in the matched set. Neither is large enough to rank confidently. Trust the ranking among the four large-sample patterns (LinkedIn template, story-led, achievement-led, brand-led).
Why the LinkedIn Auto-Celebration Drives More Reach
The data shows a pattern. The mechanism behind it is inferred, not directly measured. But the inference is straightforward, and the impressions data backs it up.
When you update your Experience section on LinkedIn with a new title, the platform asks if you want to notify your network (LinkedIn's Help Center covers the toggle). If you turn that on, LinkedIn does three things at once:
- It auto-generates a celebration post starting with "I'm happy to share that I'm starting a new position as [Title] at [Company]."
- It pushes a notification to every connection's bell icon.
- It surfaces the post in the "Notifications about you" feed for everyone who has worked with you.
The post and the notification are bundled. Your network gets nudged to congratulate you, they click in, the engagement signal tells LinkedIn's algorithm to push the post further.
That hypothesis matches what we see in the data. The LinkedIn-template bucket has higher median impressions (2,037) than story-led (1,340) or achievement-led (1,240), and higher engagement rate. So the notification isn't just driving any impressions. It's driving impressions from people who already know you and are primed to engage. That's the only read where both impressions and engagement rate can rise together.
Other explanations are possible. Selection bias is the obvious one: people who use the LinkedIn template may be people whose primary audience is their immediate professional network, who would engage with a job announcement regardless of writing quality. Our data can't fully separate the mechanism from the audience. The gap between the LinkedIn-template bucket and the custom-opener buckets is wide enough that "the auto-celebration drives more reach" is a defensible claim, but the size of the effect is harder to pin down.
The actionable read is the same either way: don't replace LinkedIn's opener with your own. The notification bundle is doing work you can't replicate manually. Where you customize is after the opener line.
The Hybrid Move: Auto-Celebration + Custom Body + Custom Image
This is the play the rest of the guide is built around.
Step 1. Update your Experience section. Go to your profile, add the new position, and toggle "Notify network" to ON. Don't post yet.
Step 2. Let LinkedIn draft the post. The draft will start with "I'm happy to share that I'm starting a new position as [Title] at [Company]." Keep that line. Editing or replacing it costs you the notification bundle, which is the thing driving the reach.
Step 3. Add 2–4 lines below the opener. Use the 5-element structure further down the guide: one specific thing you're excited about, named gratitude (tag the person), a question that invites a reply. Keep the whole post under 100 words. The length data is unambiguous: short wins.
Step 4. Replace the default image. The auto-celebration doesn't include a custom photo. This is the easiest single upgrade on top of the auto-text. Use a real photo of you, your team, your new desk, or the office. Skip stock images and logo-only cards.
Step 5. Post during your first or second week. Tuesday through Thursday, 8–10 AM local. Respond to every comment in the first hour. LinkedIn's algorithm reads early engagement as the signal to keep pushing the post.
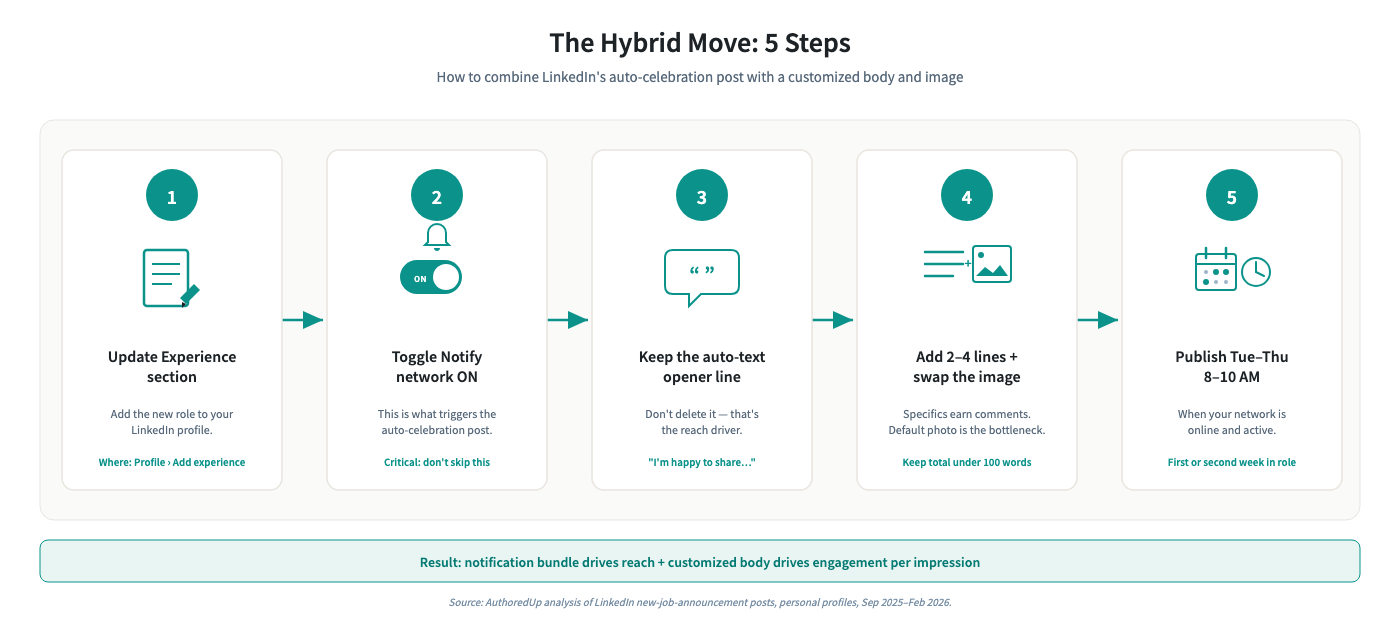
What you end up with: the distribution boost of the auto-text plus the personality of a custom post. The reader sees a familiar opener (LinkedIn's template works as recognition, not surprise), then four lines that sound like you, then a real photo. The post earns the notification surge and the per-impression engagement that comes from writing that doesn't sound generated.

When the hybrid doesn't fit: career switches, comebacks after a layoff, long searches, internal promotions where the auto-celebration doesn't fire reliably, or content creators whose audience expects pure custom posts. For those cases, use one of the 8 templates below and skip the auto-celebration entirely.
How Long Should Your New-Job Post Be?
Short.
Source: AuthoredUp analysis of LinkedIn new-job-announcement posts, personal profiles, Sep 2025–Feb 2026.

The 1–50 bracket beats every longer bracket. The drop from 1–50 to 51–100 is the biggest single move (5.22% to 3.76%). Past 100 words, engagement floats around 3%. The 301+ bracket is the worst at 2.96%.
A third of matched posts (33.7%) fit in the 1–50 range. The auto-celebration template is short by default. If you're using the hybrid move, this is what the data is telling you: keep the customized body short too. Two lines of context, one named thank-you, one question. That's enough.
If you write longer (Template 2, 6, and 7 all run 100–200 words), you're trading off roughly 1.5 points of median engagement rate for the storytelling. That's a fair trade when the story matters. It isn't a free upgrade.
8 New Job Announcement Templates for LinkedIn
These templates have two uses. Read them either way:
- As the body of a hybrid post. Pick the template that matches your situation; use its 2–3 lines of body content (everything after the opener) underneath the auto-text "I'm happy to share" line. Trim aggressively to stay under 100 words.
- As a full custom post. When the auto-celebration doesn't fit (career switches, comebacks, internal promotions, content-creator brand cadence), use the template top-to-bottom.
1. The Classic Announcement
Clean, professional, works for any industry. This is the safe choice when you're not sure what tone to strike.
I'm excited to start my new job! #newjob
I've joined [Company] as [Title].
I'll be working on [brief description of responsibilities, one sentence]. It's a space I've wanted to move into for a while, and I'm glad the timing worked out.
Thank you to everyone at [Previous Company] for [specific thing, e.g., "three years of learning how to build products from scratch"]. Special thanks to [Name] for [specific contribution].
Looking forward to what's ahead. If you're in [industry], let's connect. I'd love to learn what you're seeing in the space right now.
When to use it: Hybrid body for most corporate roles. Falls into the achievement-led bucket as a standalone (median 2.98%); much better with the auto-text opener in front of it.
2. The Career Switch
You changed fields, industries, or functions. The story is the switch. Lean into it.
I'm excited to start my new job! #newjob
From [old field] to [new field]. Here's why.
For the past [X years], I've been doing [old role/industry, one sentence]. I learned a lot. Especially [one specific lesson].
But for the last year, I kept coming back to [what drew you to the new field]. I started [learning/building/volunteering/taking courses] on the side, and eventually it clicked: this is the work I want to do full time.
Today I'm officially starting as [Title] at [Company]. I'll be [brief description of what you'll do].
If you've made a career switch, I'd love to hear what the first 90 days were like for you.
When to use it: A true career pivot. The hook is the contrast; the auto-text opener flattens that contrast, so this is one of the cases to skip the auto-celebration entirely. Before announcing your new role, consider writing a farewell post to thank colleagues at your previous company; it sets the stage for the switch announcement. Story-led in our data (median 3.17%), lower median than the LinkedIn template, but story-led posts have wider variance, and a great career-switch post can outperform anything in the dataset.
3. The First Real Job
Just graduated or landing your first full-time role. The temptation is to over-explain. Resist it.
I'm excited to start my new job! #newjob
I'm starting my career at [Company] as [Title].
Four years of [university/program/self-study] and a lot of applications later, I'm genuinely excited to get started.
Thank you to [professors/mentors/family members] who helped me get here. Especially [Name] who [specific thing].
I'll be working on [brief description]. If you're also just starting out, send me a message. Always good to know people going through the same thing.
When to use it: Entry-level roles, post-graduation jobs, first career move after a boot camp or training program. Works as a hybrid body (auto-text opener + this content) or as a full custom post. Keep it short.
4. The Promotion (Same Company)
You're staying where you are but moving up. The audience here is different: your current colleagues will see this. Acknowledge the team.
I'm excited to start my new job! #newjob
After [X years] at [Company], I'm moving into a new role: [Title]
I started here as [original role], and the path from there to here involved [brief mention of one or two things you worked on]. None of it happened alone.
Thank you to [manager/team] for backing this move. And to everyone I've worked with: you've shaped how I think about [area].
Same company, new problems to solve. Excited for what's next.
When to use it: Internal promotions, lateral moves, role expansions. The auto-celebration doesn't always fire cleanly for same-company moves (it depends on how the change is recorded), so you may need to write the post yourself. Keep the tone grateful, not boastful. Under 100 words.
5. The Boomerang
You're going back to a company you left. This is more common than people think, and there's a good story in the return.
Plot twist: I'm going back to [Company].
I left [X years ago] to [what you did in between]. It was the right call. I got to [one thing you gained]. But when the opportunity came up to return as [Title], it felt right.
Sometimes you leave to learn what you value. What I missed about [Company] was [one specific thing: the culture, the people, the product, the pace].
Round two. Let's go.
When to use it: Returning to a former employer. The "why I came back" angle is what makes this interesting; the auto-text doesn't carry it. Skip the auto-celebration here and post the custom version.
6. The Storyteller
For people who build their personal brand on LinkedIn and want the announcement to feel like a real post, not a press release.
Three months ago, I was sitting in a parking lot after an interview, thinking: there's no way I got this.
[2-3 sentences about the journey: what made this process different, what surprised you, what you almost didn't do.]
Today I'm officially [Title] at [Company].
The thing I keep coming back to: [one honest insight about the job search, the role, or the company]. I'll probably write more about this soon.
For now, thank you to everyone who rooted for this. You know who you are.
When to use it: When you have a real story and an audience that follows you for storytelling. Story-led in our sample (3.17% median). The honest read: storyteller-style posts beat LinkedIn's template when your audience already follows you for storytelling. Without that audience, the LinkedIn template's notification bundle out-reaches a polished story most of the time.
7. The Gratitude Post
Less about you, more about the people who helped. This tone works well when the move is emotional. Maybe it took a long time, or the circumstances were tough.
This one took a while.
After [context: months of searching, a layoff, a career break, relocating], I'm starting as [Title] at [Company].
I'm not going to pretend the process was easy. But I want to name a few people who made it possible:
• [Name] - [what they did]
• [Name] - [what they did]
• [Name] - [what they did]
Every message, introduction, and "let me forward your resume" mattered. Thank you.
If you're in the middle of a search right now, keep going. Feel free to reach out. Happy to help however I can.
When to use it: After a difficult search, a layoff, a career break, or any transition where gratitude is the honest emotion. Naming people specifically drives engagement because each person tagged will likely comment. Gratitude-led had a higher median than story-led in our sample, but only 8 posts matched, so don't treat that as a hack.
8. The Short and Punchy
Under 100 words. The highest-performing length range in our sample: 1–50 word posts earned 5.22% median engagement rate, beating every longer bracket.
I'm happy to share that I'm starting a new position as [Title] at [Company].
Grateful for 4 years at [Previous Company]. Ready for what's next.
If we haven't connected yet, now's a good time.
When to use it: When you'd rather let the news speak for itself. Works as a hybrid body (auto-text opener + this format underneath) or as a standalone custom post. Also useful as a secondary pinned post if you already shared a longer announcement.
When Should You Announce Your New Job?
Wait until you've officially started. Not when you've signed the offer, but when you've actually walked in the door. Offers fall through. Start dates shift. Once you're sitting at the desk, you're clear to post.
Aim for your first or second week. Post while the excitement is fresh and the details are vivid. After a month, the moment has passed and the post feels like an afterthought.
Best days: Tuesday through Thursday, between 8–10 AM in your time zone. This is when LinkedIn engagement is highest. If you're scheduling posts, pick a Tuesday or Wednesday morning. But don't overthink it. A great post on a Saturday still outperforms a mediocre one on Tuesday.
Update your profile first. Before you publish the announcement, update your headline, experience section, and any relevant skills. When people see your post and click your profile, it should already reflect the new role.
What to Add After the Opener
These five elements are what goes underneath the auto-text line in a hybrid post, or what fills out a full custom post. The best-performing custom posts in our sample cover most of them and stay under 100 words doing it.
1. Don't edit the first line.
If you're using the auto-celebration, the opener is the thing earning you reach. Editing it for "better writing" trades the notification bundle for marginally better prose; that's a bad trade. Add to the post; don't replace the opener.
2. State your new role and company clearly.
The auto-text already does this in some form, but if you're writing a full custom post, make sure title and company are visible above the "see more" fold. People skim.
3. One specific thing you're excited about.
Not "I'm excited for this opportunity." That says nothing. Instead: "I'll be building the product analytics team from scratch" or "I get to work on a problem I've been thinking about since grad school." Specificity makes the post real.
4. Gratitude (specific, not generic).
"Thank you to my former team" is invisible. "Thank you to [Name] who spent an hour every Friday helping me prep for interviews" is memorable. Tag people. They'll comment, and that boosts your reach through the LinkedIn algorithm.
5. A reason to engage.
Ask a question. Invite connections. Offer to help others in a similar position. "What's one thing you wish you'd known in your first month?" works better than ending with a period and hoping for the best.
Once you've written the post, the LinkedIn Hiring Post Audit checks it against 7 scoring elements in 30 seconds and tells you exactly what to improve.
Best Images for a LinkedIn New Job Announcement
The auto-celebration doesn't include a custom image. This is the easiest single change you can make on top of the auto-text, and it matters: a real photo signals real, not auto-generated.
What works:
- Your photo at the new office or with the team.
Authentic, personal. This is the most common choice and it performs well because it feels real, not staged. - A company-branded graphic.
Some companies provide "welcome" or "I'm joining" templates. If yours does, use it. It signals that the company is excited too. - A selfie with your badge or laptop on day one.
Casual but effective. Shows the moment is real and happening now.
What to skip:
- Stock photos. Nothing kills authenticity faster.
- Just the company logo on a white background. Looks like a press release, not a personal post.
- No image at all. You can post text-only, but you're leaving engagement on the table.
.png)
New Job Announcement Examples
Real posts from real people. Here's what works in practice.
Marete works as a recruiter and in her LinkedIn post she focuses on different perspectives, as a recruiter and as a candidate. The opener falls into the story-led bucket; the customization is the dual-perspective framing.

Martina started her post by reflecting on on the past 12 years in the previous company and showing gratitude to the people she worked with. After that she is announcing a new position, and sharing what sets the new employer apart from others.
She created a custom image, and if you are looking for new job Linkedin post image ideas this is the perfect one.

And here is a simple, yet effective post sample. It includes a short text about a new role, mention of the company and new job linkedin post image.
Mohammed Bari became a partner at KPMG and announced it in "starting a new position" post:

What makes these work: each one has a personal angle, not just a statement of fact. One tells a career story, another names specific colleagues, the third ties the new role to a professional milestone. None of them sound auto-generated. They aren't optimizing for raw reach alone; they're using the announcement as a piece of personal branding. That's exactly the work the auto-text can't do on its own.
Follow-Up Posts: Build on the Attention
The announcement opens a window. For 5–10 days after you post it, your network is paying attention to you. Smart creators use that window.
Three follow-ups worth writing in the two weeks after the announcement:
- "What I'm learning in my first week." Three to five lines on something specific: a tool you didn't expect to use, a process that surprised you, a meeting that changed how you think about the role. Post 5–7 days after the announcement.
- "The problem I'm here to solve." One paragraph that names the problem and what you're going to try first. This is the post that signals to recruiters and peers in your field that you're substantive, not just announcing. Post around the 2-week mark.
- "How the last role prepared me for this." A bridge post that connects the previous job to the new one. Useful when the transition isn't obvious; positions you as someone with a thesis, not someone job-hopping. Post around 2–3 weeks in.
Pacing matters. Don't post all three in 48 hours; you'll burn the audience. Space them out across two weeks, each one at the same Tuesday-through-Thursday 8–10 AM window. Each post under 100 words. Each one ends with a question.
The compounding effect: every follow-up reactivates engagement on the original announcement. New comments on the new posts pull old viewers back to your profile, where they see the announcement again. The notification bundle gets a second life.
Tips to Make Your Post Stand Out
Tag people you mention.
When you thank someone by name, tag them with @. They get notified, they comment, their network sees your post. It's the simplest way to expand reach.
Respond to every comment in the first hour.
LinkedIn's algorithm weighs early engagement heavily. When someone congratulates you, reply with something specific, not just "thank you!" A real reply triggers more replies from others.
Keep it under 300 words.
The best-performing announcement posts are focused, not exhaustive. You don't need to list every responsibility of your new role. You need a hook, a core message, and a reason to engage.
Preview before you post.
Use AuthoredUp's free post preview tool to see exactly how your announcement will look in the feed, including how the "see more" cutoff hits. If your hook gets buried below the fold, rewrite it.

If you want to write and format your post in one place, with hooks, formatting, and a preview built in, AuthoredUp's editor works directly inside LinkedIn. Draft the post, preview it, and schedule it for the right morning without switching between apps.

Why Isn't My New Job Post Showing on LinkedIn?
If your announcement isn't getting impressions in the first hour, the post is usually still working its way through LinkedIn's distribution but a few specific things can suppress it.
Check your audience setting first. When you click Start a post, the dropdown next to your name controls who sees the post. "Connections" reaches only your network; "Public" reaches their networks too and is what most announcement posts need. If you accidentally set it to a group or "Anyone on or off LinkedIn," distribution behaves differently.
Look at the first 30 minutes. LinkedIn's algorithm reads early engagement (likes, comments, dwell time) as the signal for whether to push the post further. If you posted at 11 PM and your network is asleep, the post never gets that early bump. Repost at 8–10 AM your audience's time zone for a second chance.
Watch your hashtag count. Three to five hashtags is the safe range. Ten or more starts looking like spam to LinkedIn's moderation, which can reduce reach without a notification.
Check whether you're shadow-suppressed on mobile only. Open the post in an incognito browser and on a colleague's phone. If it's visible to others but not to you, it's an account-level cache issue, not a moderation issue. If it's not visible to anyone, the post may be under content review (more common when announcements include external links or hashtags that conflict with current moderation patterns).
Re-check after 24 hours. A post with zero impressions at 24 hours has almost certainly been suppressed, not just slow-distributed. The fix is usually to repost without external links, with fewer hashtags, and with the audience set to Public. See LinkedIn's algorithm explained for the broader distribution mechanics, and LinkedIn's official Help Center post on post visibility for the platform's own troubleshooting guidance. If your post does land and you want to see how it's performing in real time, LinkedIn analytics in AuthoredUp tracks impression timing, engagement rate, and follower growth by post.
FAQ: New Job Announcements on LinkedIn
How do I announce a new job on LinkedIn?
The play that works best in our data: hybrid. Update your Experience section, toggle Notify network ON, and let LinkedIn draft the post with "I'm happy to share that I'm starting a new position as [Title] at [Company]." Keep that opener; you lose the network notification if you replace it. Then add 2–4 lines underneath: one specific thing you're excited about, a named thank-you, a question that invites comments. Replace the default image with a real photo. Post during your first or second week, Tuesday through Thursday, 8–10 AM. Plan 2–3 follow-up posts for the next two weeks.
If the auto-celebration doesn't fit (career switch, comeback, internal promotion, established creator brand), use one of the 8 templates above as a full custom post instead.
What should I write for a starting new position on LinkedIn?
If you're writing a hybrid post, write the body, not the opener: 2–4 short lines below the auto-text. Lead the body with one personal detail (why you made the move, what you're looking forward to, who helped). Name someone. End with a question. Keep the whole post under 100 words.
If you're writing a fully custom post (the auto-celebration doesn't fit), use a template from this guide as a starting point. Story-led and achievement-led openers both came in below the sample median in our analysis, so know that custom posts have to do real work to outperform.
When is the best time to post a new job announcement?
After you've officially started, not when you've accepted the offer. Most people post during their first two weeks. The best days are Tuesday through Thursday, 8–10 AM in your time zone. That said, a strong post on any day will outperform a weak post at the "perfect" time.
Should I use LinkedIn's auto-generated announcement?
Use it for the opener line, then customize everything below it. The auto-text is bundled with a network notification, and that bundle is what drives the engagement edge. In our analysis of new-job posts (personal profiles, Sep 2025–Feb 2026), posts opening with "I'm happy to share" earned a 5.08% median engagement rate (about 60% higher than story-led posts and about 70% higher than achievement-led posts) and drew more median impressions (2,037 vs 1,651 sample median). But the bare auto-text alone is forgettable. The hybrid (auto-text opener + customized body + custom image) is the version that earns the engagement.
The exceptions where you skip the auto-celebration entirely: established content creators whose audience expects custom posts, situations where the auto-celebration doesn't fire (internal promotions can skip it), and announcements with a real story the auto-text can't tell. In those cases, use one of the 8 templates above as a full custom post.
What image should I use for a new job LinkedIn post?
A photo of yourself at the new office, with your team, or on your first day works best. LinkedIn's "Celebrate an Occasion" feature also generates a branded image with your name and role; that's fine but a custom photo performs better. Avoid stock photos. The auto-celebration doesn't include a custom image, so swapping in a real photo is the easiest upgrade you can make on top of the auto-text.
How long should a LinkedIn new job post be?
Under 100 words. Ideally under 50. From our sample: posts in the 1–50 word range had a median 5.22% engagement rate, 51–100 had a median 3.76%, and every length bracket past 100 words floated near 3%. Length is a tax, not a feature. Keep it focused: opener, one personal detail, named gratitude, a question. The templates in this guide range from 40 words (Template 8) to about 150 words (Template 6). If you're choosing between two templates, pick the shorter one. Shorter posts tend to get read fully, which signals quality to the LinkedIn algorithm.
Should I write follow-up posts after the announcement?
Yes. The announcement opens a 5–10 day attention window. Smart creators use it. Three follow-ups worth writing in the two weeks after: "what I'm learning in my first week" (day 5–7), "the problem I'm here to solve" (week 2), and "how my last role prepared me for this" (week 2–3). Each under 100 words, each on a Tuesday-through-Thursday morning, each ending with a question. Each new post reactivates engagement on the original announcement.
Can I post a new job announcement even if I didn't change companies?
Yes. Promotions, role changes, and lateral moves within the same company are worth announcing. Use Template 4. LinkedIn's auto-celebration doesn't always fire cleanly for same-company moves (it depends on how the role change is recorded), so you may need to write the post yourself.
Should I also update my LinkedIn profile?
Yes, and do it before posting. Update your headline, add the new position to your experience section, and adjust your skills if relevant. When people see your announcement and visit your profile, everything should already match. If you're using the hybrid move, the Experience update is the publish action: toggle Notify network ON when you save. To track how the announcement affects profile views and engagement, AuthoredUp's analytics dashboard shows impressions, engagement rate, and follower growth over time.
Related reading
- Once you've landed the new role, the next post most people forget is the bookend: see our guide on the LinkedIn farewell post for the leaving-side template set.
- If you're still in the search phase, how to announce you're open to work on LinkedIn covers the inverse: signaling availability without telegraphing desperation.
- For LinkedIn's own documentation on profile updates and the auto-generated job announcement: LinkedIn Help Center: Add a new position.
- LinkedIn also publishes career-transition guidance in LinkedIn News which occasionally features template-style breakdowns of strong announcement posts.
.png)
.png)
.png)
